IDCS Applications & Groups
"Bumpy roads lead to beautiful places"
- Senior Director @ Oracle 🧑💻
- #orclapex fan since '99 🛠️
- https://spendolini.blog 💻
- Oracle Ace Alumni ♠️
- Bleed Syracuse Orange 🍊
- Golf when I can ⛳️
- Austin, TX 🎸🍻
- Views are my own 🫢
Photo by Chang Duong on Unsplash
Navigating to the IDCS Console
IDCS has its own console - unlike IAM, whose console is integrated into the OCI Console. Thus, finding it is a little tricky.
From the OCI Cloud Console main page, select the "hamburger" menu and click Identity & Security.
Under the Identity heading, click Federation.
Click OracleIdentityCloudService.
Next, click the URL next to Oracle Identity Cloud Service Console to activate the IDCS Console. It will open up in a new window and looks like this:

Creating an Application in IDCS
The first thing we'll need to do is create an application. This will map to our APEX application and provide both AuthN and AuthZ services.
From the "hamburger" menu, select Applications.
Click Add.
Click Confidential Application.
Enter
IDCS Demofor the Name.Enter the application's home page as the Application URL.
Click Next.
Select Configure this application as a client now
Check the box for Authorization Code
Enter the following for the Redirect URL, replacing [your-apex-server-name] with your actual APEX server name:
https://[your-apex-server-name]/ords/apex_authentication.callbackEnter the URL to your APEX application for the Post Logout Redirect URL. This URL should not include anything after the word "home".
Click Next.
Ensure Skip for later is selected and click Next.
Ensure Skip for later is selected and click Next again.
Click Finish.
On the next page, the Client ID & Client Secret will be displayed. Make note of these as we will need them to create a Web Credential in APEX.
- Once you dismiss the window with the credentials, be sure to click Activate to activate your application.
Integrating an IDCS Application with APEX
Let's switch back to APEX and configure our application to talk to IDCS. We'll start by creating the web credential that will store the Client ID & Secret.
Edit the Shared Components of your APEX application.
Click Credentials.
Click Create.
Enter
IDCSfor both the name and Static ID and then paste in your Client ID and Client Secret into the corresponding fields and click Create.
Next, we'll create a new Authentication Scheme and make it current.
Edit the Shared Components of your APEX application.
Click Authentication Schemes.
Click Create.
Click Next.
Set or enter the following values:
Notice: for the Discovery URL, replace [xxx] with the first portion of the URL from the IDCS console. It will look something like this:
idcs-daef12b436e472f3b6aa4ddf463e5760
| Name | IDCS |
| Scheme Type | Social Sign-In |
| Credential Store | IDCS |
| Authentication Provider | OpenID Connect Provider |
| Discovery URL | https://[xxx].identity.oraclecloud.com/.well-known/openid-configuration/ |
| Scope | profile,groups |
| Username | #sub# |
| Additional User Attributes | groups |
- Click Create Authentication Scheme.
At this point, the integration is technically set up, but there are a few more things we want to change in the APEX Authentication Scheme to make things smoother - such as being able to read IDCS groups and provide a proper logout URL.
Edit the IDCS - Current Authentication Scheme.
Enter the following code in the PL/SQL Code field under Source:
procedure group_setup
as
  l_this_group_name varchar2(255);
  l_group_count number;
  l_group_membership_list apex_t_varchar2;
begin
  l_group_count := apex_json.get_count('groups');
  if l_group_count is not null then
    for i in 1..l_group_count
    loop
      l_this_group_name := apex_json.get_varchar2(p_path => 'groups[%d].name', p0 => i);
      apex_string.push(p_table => l_group_membership_list, p_value => l_this_group_name);
    end loop;
    apex_authorization.enable_dynamic_groups(p_group_names => l_group_membership_list);
  end if;
end group_setup;
In the Login Processing region, enter
group_setupfor the Post-Authentication Procedure Name.In the Post-Logout URL section, set Go To to URL and enter the application URL in the URL field. This is the same value that was entered into the IDCS Application and should end with
/home.Click Apply Changes.
We need to make one last change. This will allow the APEX Authorization Scheme "is in Role or Group" to look at the Dynamic Groups that IDCS populates.
Edit the Shared Components of your APEX application.
Click Security Attributes.
In the Authorization region, set Source for Role of Group Schemes to Custom Code.
At this point, you should be able to run your APEX application and use your IDCS credentials to log in successfully.
Viewing Dynamic Group Membership
Before we start to integrate groups, let's add a simple report on Page 1 of our application. This report will return the list of groups that IDCS sends back to APEX. Displaying this list will be helpful when troubleshooting/developing your integration between APEX & IDCS.
Edit Page 1 of your application.
Create a new Classic Report region.
Use the following SQL as the source of the report:
select WORKSPACE_ID,
       WORKSPACE_NAME,
       WORKSPACE_DISPLAY_NAME,
       APEX_SESSION_ID,
       USER_NAME,
       GROUP_NAME
  from APEX_WORKSPACE_SESSION_GROUPS
 where apex_session_id = :APP_SESSION
- Log out and then log in to your application to see the values populated in the report. Note that some of them could be non-APEX related, as IDCS is shared across all of OCI.
Integrating IDCS Groups with APEX
Next, we'll create a group in IDCS and integrate that with APEX. Since we've done most of the groundwork already, this won't take long at all.
Login to the IDCS Console.
Click on the "hamburger" menu and select Groups.
Click Add.
Enter
usersfor the Name and click Finish.Click on the Users tab.
Click Assign Users.
Select your user and click OK.
Click on the Access tab.
Click Assign Applications.
Select IDCS Demo by clicking Assign.
Click OK.
If you switch back to your APEX application and log out and then log in again, you should see a row that contains the group users, as well as any other groups your user belongs to.
While in APEX, let's map an Authorization Scheme to this group.
Edit the Shared Components of your application.
Click Authorization Schemes.
Click Create.
Select From Scratch and click Next.
Enter or select the following options:
| Name | users |
| Scheme Type | Is In Role or Group |
| Type | Custom |
| Name(s) | users |
| Validate Authorization Scheme | Oner per page view |
- Click Create Authorization Scheme.
Now that we have a new Authorization Scheme mapped to IDCS, let's associate it with a new region.
Edit Page 1 of your application.
Create a new Static Content region called
Users.In the Security section, set the Authorization Scheme to users.
Save your changes and run Page 1.
Since your user is in the users group on IDCS, you should see this new region called Users.
Next, let's revoke the Users group from your user on IDCS.
Switch to the IDCS Console.
From the "hamburger" menu, select Groups.
Select Users.
Click on the Users tab.
Select your user and click on the Revoke button.
Click OK to confirm the removal.
Switch back to APEX, log out and log back in, and you should no longer see the Users region.
This technique can be used to create any number of roles and associate them with any APEX component. It's as easy as creating an Authorization Scheme that points to the corresponding IDCS role.
Controlling Application Access
As it stands, any authenticated user in your IDCS stripe will be able to access the APEX application that we integrated. This is because APEX is merely checking to ensure that the user has a valid IDCS session and nothing else.
In many cases, we will want to restrict access to a sub-set of users. Fortunately, that's trivial to do with IDCS.
Switch to the IDCS Console.
From the "hamburger" menu, select Applications.
Select IDCS Demo.
Select the Configuration tab.
Expand the Authentication and Authorization section.
Check the box next to Enforce Grants as Authorization.
Click Save.
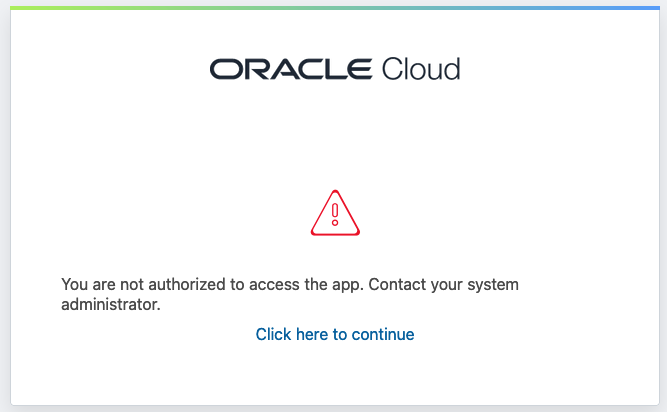
Remove your user from any role associated with this application, and then sign out and sign in again. You should see the following message:
Summary
It's pretty trivial to create an application and groups in IDCS and map them to your Oracle APEX applications. This keeps access control consolidated in a single place that is monitored and logged automatically. It also ensures that APEX applications are seen as on par with other commercial SaaS applications when it comes to integration.
Next up: Multi-Factor Authentication